When you build with React Native, you’re working with a single JavaScript codebase to create apps that run just like native ones on both iOS and Android. This approach is a game-changer because it means you can slash your development time and costs—no need for separate teams or duplicate efforts for each platform.
The end result? A high-performance app that looks and feels completely native to the user.
Why Build Your Next App with React Native

Picking a framework is a massive decision. It shapes everything from how fast you can build to how easy the app is to maintain down the road. React Native really shines here, offering a compelling mix of efficiency and performance that works just as well for scrappy startups as it does for big companies.
The core promise is beautifully simple: write your app’s logic once in JavaScript and watch it run everywhere. This isn’t just a marketing line; it leads to real savings in time, money, and developer sanity.
The Power of Code Reusability
The biggest draw for developers flocking to React Native is, without a doubt, code reuse. Instead of juggling two entirely different codebases—one in Swift for iOS and another in Kotlin for Android—you get to work with a single, clean one.
The numbers back this up. React Native has cemented its place as a top choice, capturing around 42% of the cross-platform mobile development market. In my experience, and as widely reported, most projects can easily share 70-85% of their code between iOS and Android. You can find more React Native development insights online, but the impact is clear: development cycles get shorter, and costs go down.
This level of reusability lets your team focus on what matters—building great features—instead of porting the same logic over and over.
Delivering a Genuine Native Experience
There’s a common myth that cross-platform frameworks lead to a clunky user experience. React Native busts that myth completely. It renders its UI using the platform’s actual native components, not by loading a web page inside your app.
This means that a
<Button>in your React Native code becomes a real, native button on both iOS and Android. The app doesn’t just look native; it feels native because it’s built with the same fundamental UI blocks.
This design choice is what makes the framework so successful. React Native acts as a bridge, translating your JavaScript into native code at runtime, ensuring the smooth, responsive performance users demand. You get the fast-paced development of web technologies without giving up the high-quality experience of a native app.
Choosing between React Native and traditional native development often comes down to your project’s specific needs. To make that decision a little clearer, here’s a quick side-by-side comparison.
React Native vs Native Development at a Glance
| Feature | React Native | Native (iOS/Android) |
|---|---|---|
| Codebase | Single JavaScript/TypeScript codebase for both platforms. | Separate codebases for each platform (Swift/Kotlin). |
| Team Size | Smaller team can handle both iOS and Android. | Requires specialized developers for each platform. |
| Development Speed | Faster initial development and feature releases. | Slower, as features must be built twice. |
| Performance | Near-native performance for most applications. | The highest possible performance, direct access to APIs. |
| UI Components | Uses native UI components for a genuine feel. | The original, platform-specific UI components. |
| Best For | Content-driven apps, MVPs, and business apps. | Complex, graphic-intensive apps or platform-specific features. |
Ultimately, while native development offers unparalleled performance for very demanding applications, React Native provides a practical and powerful alternative for a huge range of projects, delivering an excellent user experience with incredible efficiency.
Setting Up Your Development Environment
https://www.youtube.com/embed/4x_zW6_RKZo
Before you can even think about building a React Native app, you have to get your local environment set up correctly. This is one of those foundational steps where a little extra effort upfront saves you from a world of frustration later. A solid setup is your launchpad for compiling, running, and debugging your code smoothly.
At the heart of it all is Node.js, which comes bundled with npm (Node Package Manager). React Native relies on Node.js to execute JavaScript outside a browser and to handle all your project’s dependencies. You’ll also want a good code editor; most of the community, myself included, swears by VS Code for its incredible flexibility and extension marketplace.
Installing the Core Tools
Your first real task is getting the essential tools installed, and this depends entirely on your operating system. For both macOS and Windows, the central piece is the React Native Command Line Interface (CLI). This is what you’ll use to spin up new projects, fire up the bundler, and manage native code.
The specific path you take from here depends on whether you’re building for iOS or Android:
- For iOS: There’s no way around it—you need a Mac. You’ll install Xcode, Apple’s own IDE, which packs in the iOS Simulator and all the necessary build tools.
- For Android: You’ll need to grab Android Studio. This IDE gives you the Android SDK, the Android Virtual Device (AVD) manager to run emulators, and everything else you need for the Android side.
I can’t stress this enough: always follow the official React Native documentation for the most current and precise setup commands. They keep it updated with every release.
The official docs show two main paths: Expo Go and the React Native CLI. We’re sticking with the CLI route for this guide because it gives you full native control, which is essential for integrating tools like CodePushGo.
Creating Your First App
With all the tools installed, it’s time for the fun part. Open up your terminal, change into a directory where you keep your projects, and run the command to initialize a new React Native app. This might take a few minutes as it pulls down the project template and installs all its dependencies.
I still remember the first time I ran this command. It felt like a rite of passage. Don’t be intimidated by the sheer number of files it generates—that’s the boilerplate giving you a powerful, cross-platform starting point right out of the box.
Once the process finishes, cd into the new project folder and run the command to launch the app. The very first build will feel slow as it compiles all the native code, but don’t worry, subsequent builds are much quicker.
That moment you see the “Welcome to React Native” screen on your simulator or device is when it all clicks. You’re officially ready to start building. If you’d like another take on this process, our guide on getting started with React Native has even more tips.
Crafting Your First Interactive Component
Okay, your environment is ready to go. Now it’s time to ditch the default welcome screen and build something you can actually interact with. This is where the magic of React Native really starts to click, turning code into a tangible part of your app. We’re going to put together a simple, interactive product card that actually responds when a user taps it.
This little project will introduce you to the fundamental building blocks of any React Native UI. I like to think of them as digital LEGOs—you get a handful of core pieces that you can snap together in countless ways to build something complex and cool.
Understanding the Core Building Blocks
At the heart of every React Native app, you’ll find a few essential components. You’ll be using these constantly, so getting comfortable with them right now is the best thing you can do for your future self.
- View: This is your bread and butter. Think of a
Viewas a basic container, like adivin web development. It’s the primary tool for creating layouts with flexbox, adding styles, and handling basic touch events. - Text: Exactly what it sounds like. Any time you want to display words on the screen, you’ll wrap them in a
<Text>component. It supports nesting and styling, too. - StyleSheet: This gives you a way to organize your component’s styling in a way that feels a lot like CSS. Keeping your styles separate from your component logic is a huge win for readability and maintenance down the road.
These three are your starting lineup. Just about everything you see in a React Native app is built from these basic elements.
Managing State for Interactivity
Static screens are boring. Modern apps need to be interactive, and that’s where state comes in. State is basically a component’s private memory—a simple JavaScript object that holds data that can change as the user interacts with your app.
When a component’s state changes, React Native automatically knows to re-render it to show the new information. For our product card, we’ll use state to keep track of how many times a user has “liked” an item.
A classic rookie mistake is trying to change the UI directly. React works declaratively. You just tell it what the UI should look like for any given state, and React handles the rest. Change the state, and the UI follows.
Demand for developers who get these concepts is soaring. The global React Native app development market was valued at around USD 325 million in 2024 and is on track to hit nearly USD 500 million by 2031.
Building an Interactive Product Card
Let’s put all this theory into practice. We’ll create a simple card showing a product name, an image, and a button that adds to a “like” counter. It’s a small example, but it perfectly shows how state, styles, and core components all work together.
You’ll start by importing the components you need from react and react-native. Then, inside your functional component, you’ll use the useState hook to create a likes counter. The layout will be a View that holds Text elements and a Button that updates the state when pressed. To speed things up, you can even leverage AI code generation to get a quick boilerplate for your component.
Here’s what the structure will look like:
- Import your tools: Pull in
React,useState,View,Text,Button,StyleSheet, andImage. - Define your component: Create a function called something like
ProductCard. - Initialize your state: Set up the like counter with
const [likes, setLikes] = useState(0);. - Build the layout: Use a
<View>as the main card container, and place an<Image>,<Text>, and<Button>inside it. - Make it interactive: On the
<Button>, use theonPressprop to callsetLikes(likes + 1). - Style it up: Create your styles with
StyleSheet.createand apply them to your card, title, and button.
Getting your hands dirty with a small project like this is the absolute best way to make these concepts stick. As you move on to more complex features, you’ll find an entire ecosystem of libraries to help. For more ideas, check out our list of essential https://codepushgo.com/blog/category/react-native-components/ to see what else you can build.
Mastering Over-The-Air Updates with CodePushGo
So, you’ve managed to build your React Native app. That’s a huge milestone, but the work doesn’t stop at launch. The old-school cycle of submitting updates to the app stores, waiting days for review, and then praying users actually download the new version is a massive bottleneck. This is especially painful when you need to fix a critical bug or ship a small feature right now.
This is where Over-the-Air (OTA) updates become your superpower, and a tool like CodePushGo makes the whole process ridiculously simple.
OTA updates let you push JavaScript code and asset changes directly to your users’ devices, completely bypassing the app store review process. Think about that for a second. You can deploy bug fixes, adjust the UI, or launch new JS-based features almost instantly. It’s a total game-changer for keeping your development momentum high and reacting to user feedback in real time.
The Power of Instant Deployment
Ever spotted a glaring typo or a minor bug moments after a huge release? Instead of a multi-day panic involving a full-blown new build and another review cycle, you could push a fix that lands on your users’ phones in minutes. This kind of rapid iteration is what really separates agile, modern development teams from the rest.
With CodePushGo, this process is not just fast—it’s also secure and efficient. It works by bundling up your JavaScript code and assets and then deploying them to your app. When a user opens your app, it quietly checks with the CodePushGo server for a new update, downloads it in the background, and seamlessly installs it for the next time the app launches.
The core idea is simple but incredibly powerful: you’re only updating the parts of your app that can be changed on the fly (the JS bundle), without touching the native code that required that initial app store approval. This keeps you fully compliant with store policies while giving you deployment speeds you could only dream of before.
Integrating CodePushGo into Your Project
Getting started is a lot easier than you might think. The first real step is to get the CodePushGo SDK integrated into your React Native project. This just means adding the package via npm or yarn and then linking it to your native iOS and Android projects.
Once the SDK is installed, you’ll need to wrap your root component with the CodePushGo higher-order component. This one small code change is the magic that allows your app to talk to the CodePushGo servers and handle the entire update process on its own. It takes care of checking for updates, downloading them, and applying them at just the right moment.
This visual flow shows just how straightforward the process is for getting your OTA updates out the door.
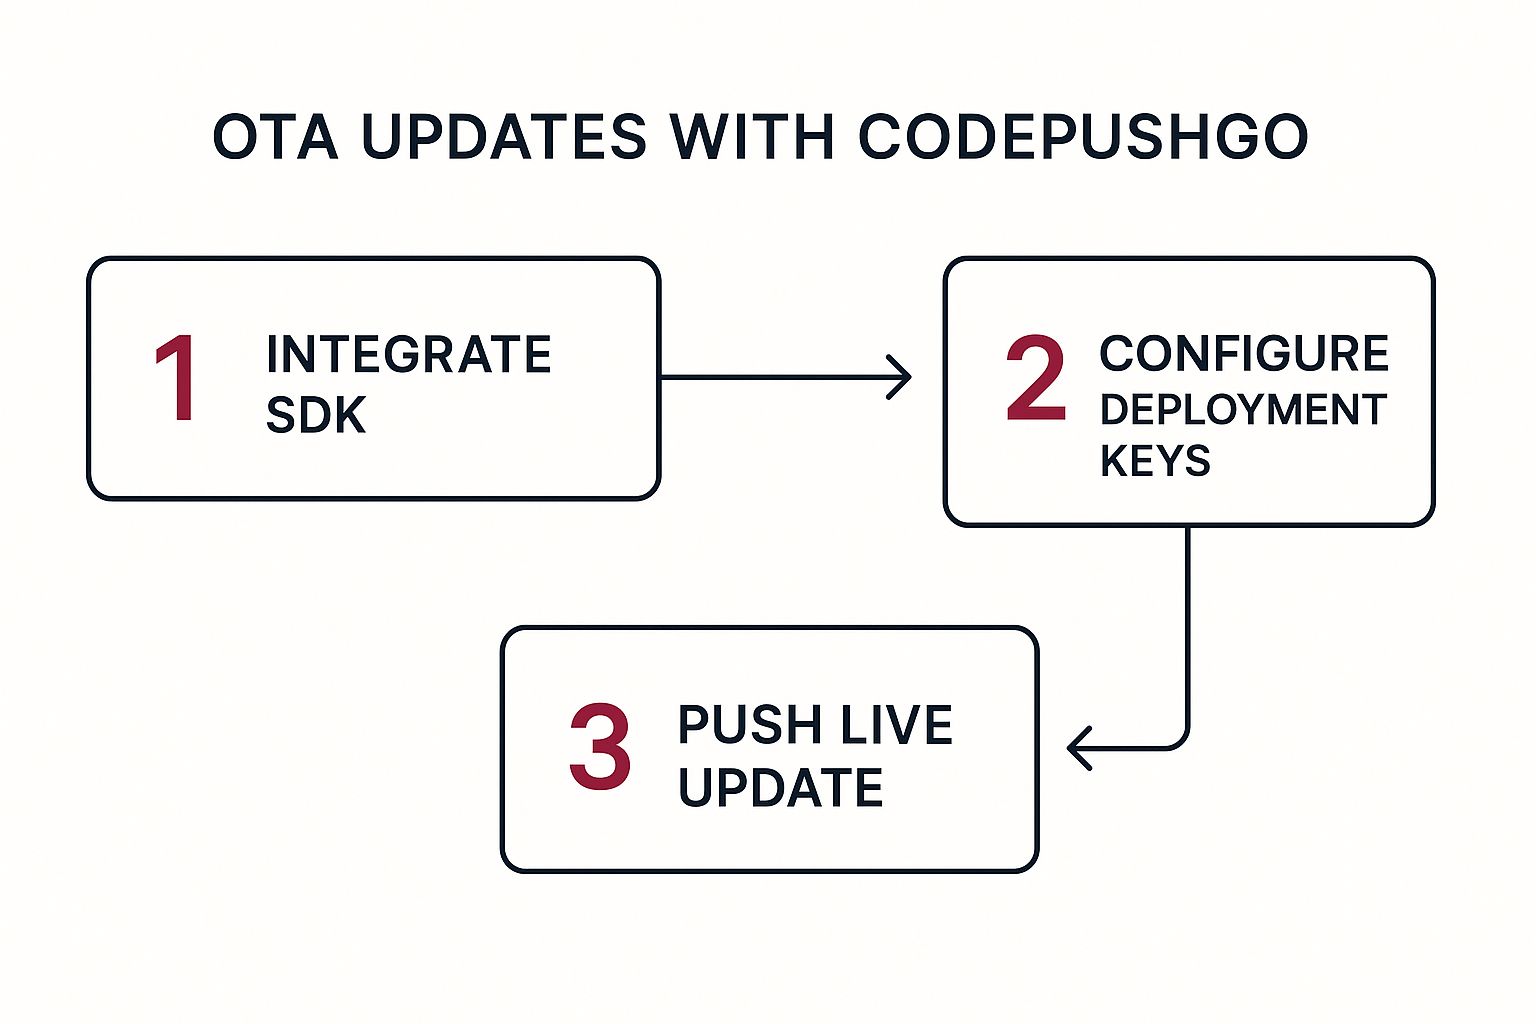
As you can see, the whole workflow is built for speed and simplicity. It’s designed to let you stay focused on writing code instead of getting bogged down in complicated deployment logistics.
Pushing Your First Live Update
With the setup out of the way, you’re ready to deploy. Every app in CodePushGo comes with deployment keys—usually, you’ll have one for Staging and one for Production. This is a fantastic feature because it lets you test your updates on an internal build before you even think about pushing them to your actual users.
Pushing an update is as simple as running a single command-line action. You just point the CodePushGo CLI to your app’s JavaScript bundle and tell it which deployment you’re targeting. For example, you could push a new feature to your internal QA team by using the Staging key.
Once you’re confident that the update is stable and works perfectly, you promote it to Production. This is where the magic happens. A typical workflow looks something like this:
- Code your changes: Make whatever tweaks or additions you need in your JavaScript files.
- Release to Staging: Use the CLI to push the new bundle to your Staging environment.
- Verify everything: Grab a real device, get the staging build, and test the update to make sure it’s all working as expected.
- Promote to Production: Once it’s been verified, you release that same update to your Production deployment. It’s now live for all your users.
This controlled rollout strategy is a lifesaver. It minimizes risk and helps ensure a smooth, bug-free experience for everyone using your app. For a deeper dive into this topic, you might want to check out our guides on deploying a React Native app. Honestly, mastering this skill is essential for anyone serious about efficiently maintaining a React Native app over the long haul.
Preparing Your App for Launch

Taking your app from a local project to a live application is a huge milestone. This is where all your development effort comes together, and the focus shifts to polish, performance, and the nitty-gritty details of app store guidelines. It’s time to get your app ready for the real world.
The first major task is to create a production-ready “release” build. A debug build is great for rapid development, but a release build is a whole different beast—it’s optimized, minified, and ready for users. This process packages up all your JavaScript and assets so the native platforms can run your app smoothly.
Generating Your Release Builds
For Android, this means creating a signed APK or, more commonly now, an Android App Bundle (AAB). Google Play strongly recommends the AAB format because it allows for smaller, more efficient downloads customized for each user’s device. To do this, you’ll need to generate a private signing key, which is essentially your app’s digital signature.
Over on the iOS side of things, it’s all handled through Xcode. You’ll “archive” your app, which packages it for submission to the App Store. This requires setting up code signing with your Apple Developer account, a crucial security measure that proves you are who you say you are.
A word of advice from experience: don’t leave iOS code signing for the last minute. Provisioning profiles and certificates can be a real headache. I’ve seen developers get stuck for days on this alone. Tackle it early in the process to save yourself a lot of stress.
Final Pre-Launch Checklist
Before you’re tempted to hit that “submit” button, running through a final checklist can be the difference between a smooth launch and a painful rejection. This is your chance to put on a user’s hat and make sure everything is perfect.
Here’s what should be on your list:
- Physical Device Testing: Simulators are fantastic, but they don’t tell the whole story. You need to test on actual hardware to catch those pesky UI glitches and performance hiccups that only show up on real devices.
- App Icon and Splash Screen: Make sure you have all the required sizes for your app icon and launch screen configured for both platforms. It’s a small thing, but it makes your app feel polished and professional right from the start.
- Permissions and Privacy: Take a moment to review the permissions your app requests. Are they all absolutely necessary? And crucially, make sure you have an effective privacy policy ready, especially if you’re collecting any user data at all.
The submission process itself can feel like navigating a maze. For a more detailed breakdown, we’ve put together a guide on how to publish to the app store that walks you through the steps. Taking these final checks seriously is what elevates a cool project into a truly successful app.
Common Questions I Hear About Building React Native Apps
When you first dive into building apps with React Native, a few questions always seem to pop up. Getting these sorted out early on can save you a ton of headaches and help you sidestep some common pitfalls.
I get asked all the time if it’s possible to mix native code with React Native. The answer is a big yes—in fact, it’s one of the framework’s biggest strengths. React Native was built for this kind of flexibility. You can easily write custom native modules in Swift or Kotlin for anything from performance-critical calculations to tapping into specific device hardware that isn’t exposed to JavaScript.
Performance and Your Development Workflow
Another hot topic is always performance. Can a React Native app really feel as snappy and smooth as a fully native one? For the vast majority of apps out there, the user won’t be able to tell the difference. Performance is excellent. A purely native app might still have a slight advantage for something like a graphically intense 3D game, but React Native’s architecture is more than capable of delivering a highly responsive experience for almost everything else.
From my experience, the real performance killers aren’t coming from the framework itself. They almost always stem from inefficient JavaScript code. If you take the time to profile your JS thread and optimize your components, you can build incredibly fast apps.
Finally, there’s the big decision: do you use the React Native CLI or go with the Expo ecosystem? Expo is fantastic for getting started quickly. It offers a managed workflow that abstracts away a lot of the native configuration, which is a huge time-saver.
On the other hand, the React Native CLI gives you the keys to the kingdom. You have full, direct access to the underlying native projects. This level of control is non-negotiable when you need to integrate custom native modules or tackle complex security requirements, such as understanding code signing. Your choice really boils down to what you value more for your specific project: simplicity or complete control.
Ready to ship updates instantly and bypass the app store queue? CodePushGo empowers you to deploy fixes and features to your users in minutes, not days. Get started for free at https://codepushgo.com and take control of your release cycle.


