Building a React Native app means you write your code once and it runs natively on both iOS and Android. It’s a massive time and resource saver. This approach lets you tap into your existing JavaScript skills to create high-performance mobile apps without the headache of managing two completely separate projects. For getting to market quickly and efficiently, it’s a brilliant strategic move.
Why React Native Is Such a Smart Choice for App Development

Before we jump into the code, it’s worth understanding why this framework is such a heavy hitter in the mobile world. At its heart, React Native elegantly solves the classic, costly problem of maintaining different codebases for iOS and Android. It’s built on a “learn once, write anywhere” philosophy, giving developers a powerful shortcut to launch on both major app stores.
This single-codebase model delivers real, tangible benefits to any business. Just think about it: less complexity, lower development costs, and a much faster path from idea to launch. Instead of your team doing everything twice for every new feature or bug fix, they can concentrate their efforts on one unified development cycle. It’s a total game-changer, whether you’re a lean startup or a massive enterprise.
The Power of a Unified Codebase
The most obvious win here is financial. When you choose to build a React Native app, you’re not just writing code—you’re making a savvy business decision. A single team of JavaScript developers can build and maintain the entire application for both platforms, which dramatically reduces hiring needs and operational costs.
This approach also pays dividends in user experience. Having one codebase naturally leads to a more consistent look, feel, and functionality across devices. Your app behaves predictably whether a user is on an iPhone or a Google Pixel, which strengthens your brand and eliminates user frustration.
A Thriving and Supportive Ecosystem
Beyond the code itself, React Native’s biggest asset is its enormous community. This isn’t just a tool; it’s a massive, living ecosystem supported by Meta and countless developers worldwide. When you hit a roadblock, it’s almost certain someone else has already figured out a solution and shared it online.
This widespread adoption is a clear indicator of the framework’s reliability and developer satisfaction. It’s a mature technology you can confidently build a business on.
This incredible community has churned out a huge library of pre-built components and packages that solve common development challenges, from screen navigation to complex animations. The whole experience is backed by solid tooling that makes debugging and testing so much easier. In fact, React Native is the go-to for over 32% of mobile developers globally, cementing its place as a top-tier framework. You can dive deeper into how it stacks up against other options in this detailed 2025 cross-platform analysis. It’s a choice that provides a rock-solid foundation for any project.
2. Preparing Your Development Environment
Before you even think about writing a single line of code, you have to get your workshop in order. Setting up your development environment for React Native is probably the most critical part of the whole process. Get it right, and you’ll have a smooth ride; get it wrong, and you’ll be pulling your hair out over cryptic errors for days. The choices you make right now will dictate your entire workflow.
At a minimum, every React Native project leans on a few core technologies. You absolutely need Node.js to run JavaScript outside a browser, and a package manager like npm or Yarn to handle all your project’s dependencies. If you’re planning on building for Android (and you probably are), you’ll also need to install the Java Development Kit (JDK). These are the absolute fundamentals.
This handy little diagram lays out the typical path you’ll take when getting your machine ready for React Native.
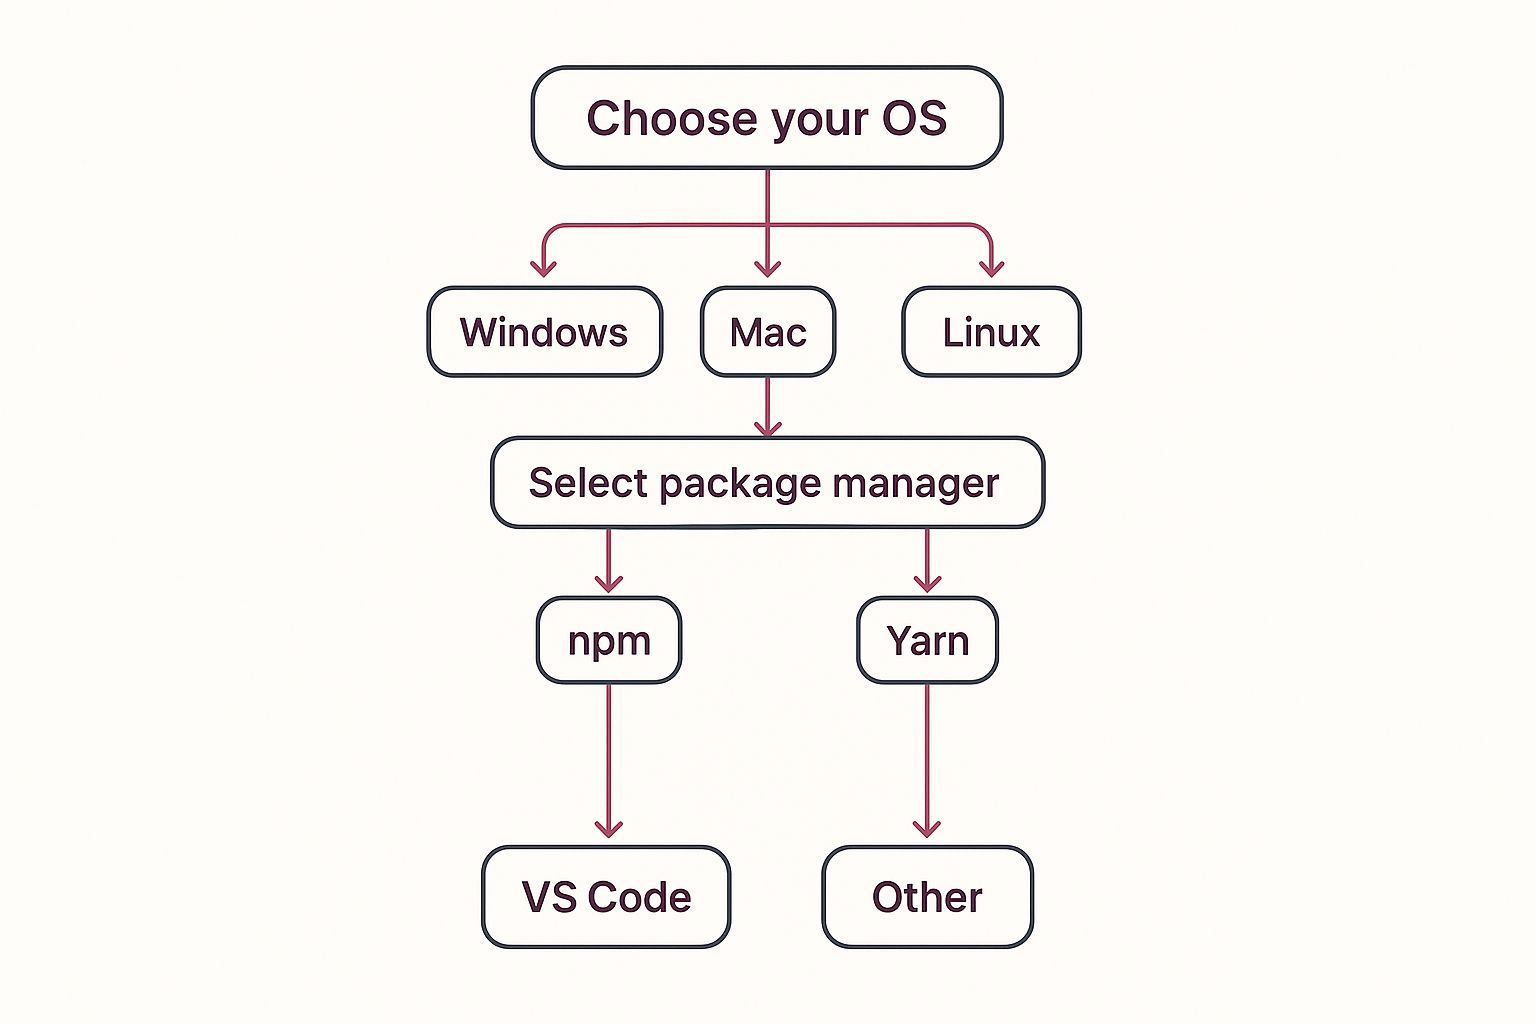
As you can see, no matter what operating system you’re on, the essential tools—like your package manager and code editor—are going to be the same across the board.
Choosing Your Workflow: Expo Go vs. React Native CLI
The first major fork in the road is deciding between two main toolchains: Expo Go and the React Native CLI. This isn’t just about picking a tool; it fundamentally changes how you’ll build, test, and ship your app.
-
Expo Go is the managed, “batteries-included” approach. It handles a ton of the complicated native setup for you. The big win here is speed. You can literally have a new project up and running on your phone in a couple of minutes just by scanning a QR code—no need to open Xcode or Android Studio.
-
React Native CLI is the traditional, “bare-bones” route. This gives you direct access to the underlying native iOS and Android projects. It’s the way to go if you know you’ll need to write custom native code or use a specific third-party library that isn’t part of the Expo ecosystem.
So, which one is for you? It really boils down to your project’s needs. For a deeper dive into these initial steps, our complete guide on getting started with React Native is a great resource.
I like to think of it this way: Expo Go is an all-inclusive toolkit that lets you start building features right away. The React Native CLI, on the other hand, is like being handed the keys to the entire workshop—it’s more powerful and you have total control, but you’re also responsible for every single tool and its configuration.
To help you decide, let’s put them head-to-head.
Expo Go vs. React Native CLI: A Quick Comparison
This table should help you figure out which toolchain aligns better with your project goals by comparing their features, benefits, and limitations.
| Feature | Expo Go | React Native CLI |
|---|---|---|
| Setup Speed | Blazing fast. You can skip most of the native configuration. | Much slower. Requires you to manually set up Xcode and Android Studio. |
| Native Code | Limited. Writing custom native modules means “ejecting” to a bare workflow. | Full, unrestricted access to the native iOS and Android projects from day one. |
| Ease of Use | Perfect for beginners or anyone focused on rapid prototyping. | Has a steeper learning curve. Better suited for experienced developers. |
| Flexibility | Less flexible. You’re mostly limited to the Expo SDK and its APIs. | Extremely flexible. You can integrate any native library or custom code you want. |
| Prototyping | The undisputed champion for quickly building and sharing app demos. | You can still do it, but it’s a much more involved process than with Expo. |
There’s no wrong answer here, only what’s right for your application. If your app is going to rely on fairly standard device features and you value speed, Expo Go is a fantastic choice. But if you have a feeling you’ll need deep native integrations or you just want maximum control from the start, going with the React Native CLI will save you from a painful migration down the line.
Creating and Running Your First Project
With your development environment all set up, we get to the fun part: actually creating the project. This is where your idea starts to take shape as real, tangible code. The command you’ll use hinges on whether you went with the Expo or the React Native CLI path.
If you chose Expo for its simplicity, getting a new project off the ground is a breeze. You just need one command in your terminal, and it will scaffold a complete project with all the starter files and a basic screen ready to go.
For instance, to spin up an app called MyAwesomeApp, you’d run this:
npx create-expo-app MyAwesomeApp
On the other hand, if you picked the React Native CLI for that extra layer of control, the command is just a little different but accomplishes the same goal:
npx react-native@latest init MyAwesomeApp
Either way, you’ll end up with a new directory packed with files. Let’s take a quick look at what’s inside.
Understanding the Project Structure
Once the command finishes its magic, you’ll see a bunch of new files and folders. It might look a bit overwhelming at first, but you only need to worry about a few key files to get started.
Here are the main players you’ll be working with most of the time:
App.js(orApp.tsx): This is the front door to your app. It’s the very first component that loads and the place where you’ll start piecing together your UI.package.json: The heart and soul of any modern JavaScript project. It keeps track of all your app’s dependencies (the libraries you’re using), holds scripts for running and building, and contains other important project info.assetsdirectory: A simple folder for storing things like images, custom fonts, and icons. When you reference these files in your code, the bundler knows to look in here.
We’ve got a much deeper dive into every file and a walkthrough of how to tweak that initial screen in our guide on creating a React Native app from scratch. It’s worth a read if you want to understand the nuts and bolts.
Firing Up Your Application
Alright, let’s see this thing in action. To get your app running, we need to start the Metro bundler. Think of Metro as a powerful tool that takes all your JavaScript code, bundles it up, and serves it to your simulator or physical device.
First, navigate into the new project directory you just created:
cd MyAwesomeApp
Then, run the command to kick things off. For Expo projects, it’s simply:
npx expo start
For React Native CLI projects, you need to tell it which platform you’re targeting:
- For iOS:
npx react-native run-ios - For Android:
npx react-native run-android
This command wakes up the Metro development server in your terminal and, after a moment, your app should pop up in the simulator or emulator. If you have the Expo Go app on your phone, you can even just scan the QR code that appears in the terminal to run it directly on your physical device.
This near-instant feedback is one of the biggest wins of the React Native workflow. Every time you hit save on a file, Metro repackages your code and pushes the update to your app in seconds. You see your changes live without needing a full, time-consuming rebuild.
This rapid development cycle is a huge reason why the demand for cross-platform developers is exploding. In fact, the global React Native app development market was valued at USD 325 million in 2024 and is expected to hit USD 499 million by 2031. You can read more about these projections and the growth of React Native app development to get a sense of the industry you’re diving into.
Building a Basic UI and Implementing Navigation

Now that your project is up and running, you’re staring at a blank canvas. This is where the magic happens—turning lines of code into an actual user experience. In React Native, everything you see on the screen is built from a collection of core components. Think of them as pre-made UI building blocks you can snap together to create your app’s interface.
You’ll quickly become familiar with three fundamental components: View, Text, and StyleSheet. A View is your go-to container, much like a <div> in the web world. It’s perfect for grouping other components and applying styles to structure your layout. Any text you want to show users has to live inside a Text component.
And how do you make it all look good? That’s where StyleSheet comes in. This API lets you define styles in a JavaScript object, a method that will feel right at home if you have any CSS experience. It’s a clean way to keep your layout logic separate from your presentation rules.
Crafting Your First Screen
Let’s put this into practice by building a simple home screen. We’ll start with a main View to hold everything, then drop in a Text element to display a welcome message. To add some interactivity, we’ll use the TouchableOpacity component, which gives us a nice, tappable button with built-in visual feedback.
Here’s what that looks like in your App.js file:
import React from ‘react’; import { StyleSheet, Text, View, TouchableOpacity } from ‘react-native’;
export default function App() {
return (
const styles = StyleSheet.create({ container: { flex: 1, justifyContent: ‘center’, alignItems: ‘center’, }, title: { fontSize: 24, marginBottom: 20, }, button: { backgroundColor: ‘#007AFF’, padding: 10, borderRadius: 5, }, buttonText: { color: ‘#FFFFFF’, fontSize: 16, }, }); Just like that, you’ve got a styled, interactive screen. This is the first real step toward a fully-fledged UI. If you want a more in-depth guide on this, we’ve got some great tips for building apps with React Native in our dedicated post.
Implementing Screen Navigation
Of course, a single screen doesn’t make an app. Users need a way to move around, and that’s where navigation comes into play. The community has overwhelmingly rallied behind React Navigation as the go-to library for this job. It makes setting up common patterns like stacks, tabs, and drawers surprisingly straightforward.
To get started, you’ll need to pull in a few packages:
npm install @react-navigation/native @react-navigation/stack react-native-screens react-native-safe-area-context
The stack navigator is the pattern you’ll use most often. It treats your screens like a stack of cards—you push new screens onto the top, and the back button simply pops the top one off to reveal what’s underneath.
Once those libraries are installed, you can define a navigation container and register your screens. For instance, you could create a flow where a user lands on a HomeScreen and can tap our new button to navigate to a DetailsScreen. Mastering this skill is absolutely essential, as it forms the very backbone of your app’s user flow.
Deploying Updates Without the App Store

One of the biggest wins when you create a React Native app is the power to sidestep the painful app store review process for most of your updates. This is all thanks to something called Over-the-Air (OTA) updates. OTA lets you push changes directly to your users’ phones, transforming what could be a week-long waiting game into a deployment that’s over in minutes.
This is more than just a convenience—it’s a game-changer for iterating quickly. Picture this: you’ve just launched a huge new feature, and a critical bug immediately surfaces. Instead of panicking and rushing an expedited store review, you can patch the bug and push the fix almost instantly with an OTA update. Your user experience is saved, your app ratings are protected, and you can breathe a sigh of relief.
How OTA Updates Work
So, what’s the secret sauce? It all comes down to the difference between your native code and your JavaScript bundle. Every React Native app has two core components: the native shell (the iOS and Android-specific code) and the JavaScript that powers your app’s logic and UI.
Anytime you touch the native side of things—say, adding a new device permission or integrating a new native module—you have no choice but to submit a fresh build to the App Store or Google Play. But here’s the thing: most of your daily work, like tweaking the UI, squashing logic bugs, or rolling out new features written in JavaScript, only affects the JS bundle.
OTA services essentially let your app download a new, updated JavaScript bundle quietly in the background. The next time the user launches the app, it loads the new code, and poof—they see your changes without ever having to hit “Update” in the app store.
This powerful capability is a massive reason why the framework keeps growing. In just a couple of years, React Native’s market share has jumped to 6.75% from 4.73%. With giants like Facebook and Instagram building on it, you know it’s battle-tested for serious applications.
Getting Started with EAS Update
If you’re in the Expo ecosystem, the best tool for the job is Expo Application Services (EAS) Update. It’s a beautifully integrated service that takes care of all the heavy lifting—hosting your update bundles, delivering them securely, and making the whole process incredibly smooth.
Getting your project ready for EAS Update involves just a few straightforward steps.
First, you’ll need to install the expo-updates library. This tiny package is the bridge that contains the native code your app needs to check for and apply new updates.
Next, you’ll pop open your app.json or app.config.js file to add a bit of configuration. This is where you’ll tell your app where to look for updates by setting an update URL that points to the EAS servers.
Finally, you’ll create a native development build of your app using EAS Build. This build is special because it comes with the expo-updates module baked right in, making it ready to receive all your future OTA updates.
Once you’ve done this one-time setup, pushing new JavaScript changes is as simple as running a single command. The entire process of https://codepushgo.com/blog/deploying-react-native-app/ this way puts your development cycle into overdrive, letting you react to user feedback faster than ever before.
Common Questions About Building React Native Apps
Diving into React Native for the first time? It’s normal to have a few questions swirling around. Let’s walk through some of the most common ones I hear from developers to help you get started on the right foot.
One of the first things people ask is about performance. Can a React Native app really keep up with one written in Swift or Kotlin? For most apps, the answer is a resounding yes. Users honestly won’t feel a difference.
With the New Architecture, React Native is faster than ever. When performance issues do crop up, it’s almost always a bottleneck in your own code, not a limitation of the framework itself.
Another big question revolves around Expo. The old debate was about “ejecting” to get access to native code, but that’s not really how it works anymore. The modern approach is to create a development build. This gives you the best of both worlds—you can add any native module you need while keeping all the great tooling and services that make Expo so powerful.
Key Decisions and Best Practices
Making a few smart decisions early on will save you a world of hurt down the road. Here are a few things to keep in mind as you start building.
- When to Use Native Code: You’ll only need to write custom native code for very specific things, like integrating with unique hardware or handling heavy, performance-critical jobs like complex image processing. For almost everything else, there’s a library for it.
- Managing State: For smaller apps, React’s built-in tools like
useStateanduseContextwork just fine. But as your app gets more complex, you’ll want to look at a dedicated state management library like Zustand or Redux Toolkit to keep your data flow clean and predictable. - Tracking App Performance: Don’t just guess where your app is slow. Use a tool like Flipper to find the real bottlenecks. Even better, set up proper monitoring to see how your app performs for actual users. You can learn more about setting up analytics for React Native to make data-driven decisions.
The most successful React Native projects are the ones that lean into the framework’s strengths. Exhaust the massive ecosystem of JavaScript libraries to build an incredible user experience first, and only reach for custom native code when you absolutely have to.
Choosing React Native means you’re tapping into a huge, flexible ecosystem. By getting familiar with its quirks and best practices, you’ll sidestep common issues and be well on your way to building fantastic cross-platform apps.
At CodePushGo, we simplify the update process, allowing you to deploy features and fixes directly to users without waiting for app store reviews. Learn more about CodePushGo.


