Getting your app onto the App Store boils down to three main phases: getting your house in order, handling the technical setup, and finally, submitting it to Apple. Before you even think about opening Xcode for the final build, you’ll need to sign up for the Apple Developer Program, get intimately familiar with their guidelines, and have all your app’s information ready to go. Nailing these fundamentals is the secret to a launch that doesn’t hit a wall of rejections.
Your Essential Pre-Launch Checklist
A successful App Store launch starts long before you’re ready to upload a build. This prep work is the foundation for everything that follows. I’ve seen countless developers try to rush this part, only to get bogged down in frustrating rejections and delays later. The whole point here is to get your app aligned with what Apple expects right from the get-go.
Taking this proactive approach does more than just save you time—it forces you to think strategically about where your app fits in the market. For instance, knowing the market dynamics can shape your entire strategy. It’s projected that by 2025, the App Store will pull in $138 billion in revenue, with a staggering $82 billion of that coming from games alone. Understanding trends like these helps you position your app for success.
Enroll in the Apple Developer Program
First things first, you have to join the Apple Developer Program. This isn’t optional; it’s the only way to get your app onto the App Store. This membership unlocks all the tools, beta software, and resources you’ll need for development and distribution.
The annual fee is $99 for individuals and organizations. In return, you get the ability to create the certificates and provisioning profiles that Xcode needs to sign your app. This signature is how Apple knows the app came from a verified, trusted developer. The identity verification process can take a few days, so do yourself a favor and get this sorted out early.
Here’s a quick look at the two primary types of Apple Developer Program memberships available for individuals and organizations.
Apple Developer Program Membership Comparison
| Feature | Individual | Organization |
|---|---|---|
| Membership Fee | $99/year | $99/year |
| Seller Name | Your personal legal name | Your company’s legal name |
| Team Management | Single developer only | Multiple team members with assigned roles |
| Verification | Personal identity verification | D-U-N-S Number and legal entity verification |
Ultimately, the choice depends on whether you’re a solo developer or part of a larger team. The Organization account is essential for companies that need multiple people accessing the developer portal and certificates.
Internalize Apple’s App Store Review Guidelines
So many rejections happen for one simple reason: developers don’t read the rules. Apple’s App Store Review Guidelines aren’t just a friendly suggestion—they’re the rulebook. Your app’s approval literally depends on following them.
The guidelines are broken down into five core sections: Safety, Performance, Business, Design, and Legal. If you read nothing else, pay close attention to Guideline 2.1 - Performance: App Completeness. Submitting a buggy or half-baked app is the fastest ticket to a rejection email.
Before you lock in your final feature set, give these guidelines a thorough read. It will save you from common headaches related to user privacy, data handling, and in-app purchases. And of course, you absolutely have to test your app to death. For more on that, check out our guide on how to properly test a mobile app: https://codepushgo.com/blog/how-to-test-a-mobile-app/
This infographic gives a great visual overview of these critical first steps.
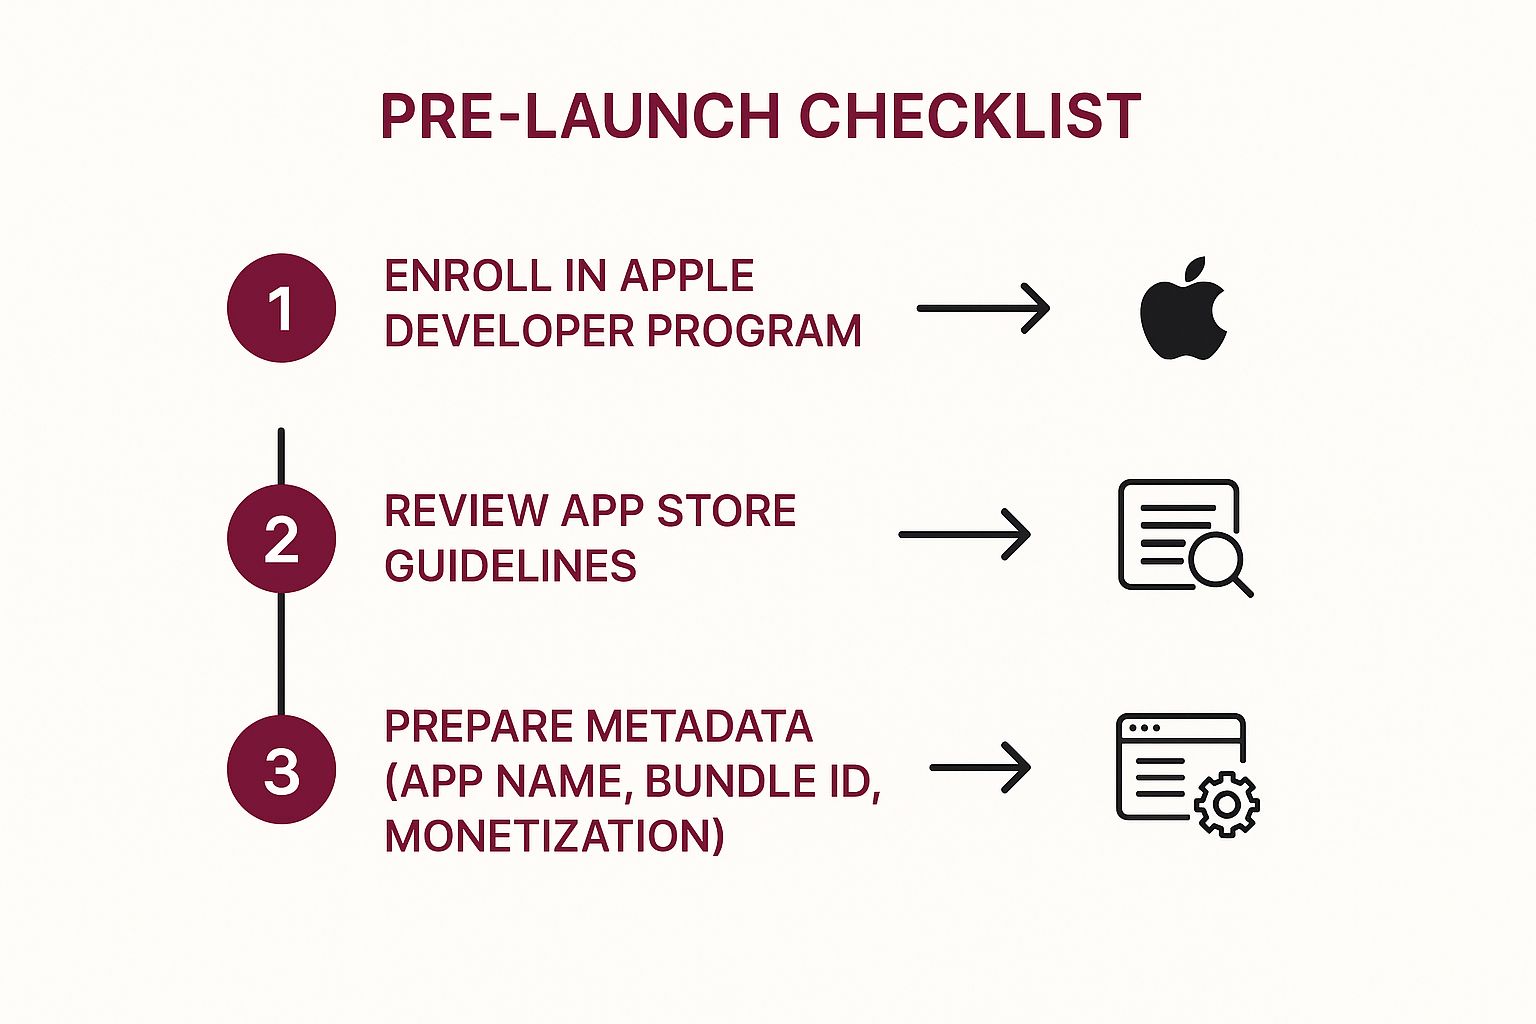
As you can see, getting enrolled, understanding the rules, and prepping your metadata are the building blocks you need in place before anything else.
Prepare Your Core App Metadata
While the code is still being polished, you can get a head start by gathering all the information for your App Store product page. This is the stuff users see before they download, and it all needs to be ready when you submit.
Here’s what you’ll need to have figured out:
- App Name: It has to be unique and stay under 30 characters. Make it something catchy that also hints at what your app does.
- Bundle ID: This is a unique identifier in a reverse-domain format (like
com.yourcompany.appname). Once you set this and your app goes live, you can’t change it. Choose wisely. - Monetization Model: How will you make money? Decide now if your app will be free, paid upfront, or use in-app purchases or subscriptions. This decision will shape your entire revenue strategy down the line.
Having these details sorted out early makes the final submission process in App Store Connect so much smoother. For a more holistic view of launching an app successfully, take a look at this excellent guide to a successful mobile application launch, which covers a lot more than just the submission itself.
Mastering Certificates, Identifiers, and Profiles
Let’s be honest: navigating Apple’s code signing system is where a lot of developers get tripped up. It can feel overly complicated at first, but it’s a crucial security process that ensures every app on the App Store comes from a known source and hasn’t been secretly modified.
To get through it, you really only need to understand three core pieces: Certificates, Identifiers, and Profiles.
Think of it this way. Your Certificate is your personal driver’s license—it proves you are who you say you are. The App ID (an Identifier) is like the unique VIN for your car—one of a kind. And a Provisioning Profile is the registration document that ties your license to your car’s VIN, making it street legal.
Generating Your First Certificate
Everything starts with a Certificate Signing Request, or CSR. This is just a block of encrypted text you generate right on your Mac using the Keychain Access app. It contains your identity info, which you’ll then upload to the Apple Developer Portal.
Apple takes that CSR file and issues a cryptographic certificate—your official digital signature. This is what makes you a trusted developer in their eyes.
You’ll mainly deal with two kinds of certificates:
- Apple Development: This one lets you sign your app so it can run on the specific test devices you’ve registered in your account.
- Apple Distribution: This is the big one. You’ll use it to sign the final version of your app for submission to the App Store.
If you want to get into the nitty-gritty of each certificate type, this article offers a great breakdown of the https://codepushgo.com/blog/apple-developer-certificate/ and its role.
Creating a Unique App ID
Once your developer identity is set, your app needs its own unique identity. That’s the App ID. Every single app requires one, and it’s basically your app’s Bundle ID combined with a Team ID that Apple assigns to you.
You’ll create this in the “Certificates, Identifiers & Profiles” section of the developer portal, and you’ll face two options:
- Explicit App ID: This is tied to a single app (e.g.,
com.yourcompany.awesomenewapp). You absolutely need this if you plan on using services like Push Notifications, Sign in with Apple, or In-App Purchases. - Wildcard App ID: This can be used for multiple apps (e.g.,
com.yourcompany.*). It’s fine for quick prototypes, but for a real App Store release, you’ll almost certainly need an explicit one.
Pro Tip: Just save yourself the headache and always create an Explicit App ID for any app you plan to publish. You’ll thank yourself later when you decide to add a new feature that requires it.
While you’re setting up the App ID, you’ll also select the “Capabilities” your app needs. This is where you tell Apple you want to use things like Game Center, Apple Pay, or iCloud. Ticking these boxes here ensures those permissions get baked into the provisioning profile we’re about to create.
Tying It All Together with Provisioning Profiles
The Provisioning Profile is the final piece of this puzzle. It’s a file that bundles your certificate and App ID together, essentially giving you permission to install the app. Xcode grabs this profile to sign your app correctly before building it.
You’ll need to create at least two types of profiles:
- Development Profile: This connects your Development Certificate, your App ID, and a list of specific UDIDs (Unique Device Identifiers) from your test iPhones and iPads. It answers the question, “Which developers can run this specific app on these specific devices?”
- App Store Distribution Profile: This one’s much simpler. It just links your Distribution Certificate to your App ID. There are no device IDs here because its only job is to sign the app for upload to App Store Connect.
A classic rookie mistake is forgetting to register a test device’s UDID in the developer portal. If a device isn’t listed in your development profile, Xcode will simply refuse to install the build on it. Apple gives you 100 devices of each type per year, so choose which ones you add carefully! Getting this part right is a non-negotiable step to publish an app on the App Store.
Setting Up Your Product Page in App Store Connect
Alright, with all the certificates and profiles sorted, it’s time to leave the developer portal behind and head over to App Store Connect. This is where the magic really happens—where your technical build starts looking like a real product that people will actually see and download.
Think of your product page as your digital storefront. Getting it right is a huge part of learning how to publish an app on the app store, because everything you put here—from the name to the screenshots—will directly impact whether someone taps that “Get” button. You only get one chance to make a great first impression.
Creating Your App Record
First things first, you need to create a new app record in App Store Connect. This is basically a container that will hold all your app’s metadata and, eventually, your builds. Just look for the blue plus (+) icon and select “New App.”
You’ll be prompted to fill in some foundational details. It’s pretty straightforward, but you need to get it right:
- Platform: Choose iOS.
- Name: This is what users will see on the App Store. Keep it under 30 characters.
- Primary Language: Pick the main language for your app’s description and details.
- Bundle ID: You’ll see a dropdown here. Select the exact, explicit App ID you created earlier. No wiggle room on this one—it has to be a perfect match.
- SKU: This is just a unique ID for your own records; users won’t see it. Something simple like
YOURAPPNAME_001is all you need. - User Access: Decide if you want to give everyone on your team access to this app record or limit it.
Once you hit “Create,” your product page is officially born. Now the real work begins.
Populating Essential Information
After creating the record, you’ll land on the “App Information” page. This is where you’ll fill out the core details that define your app’s presence and help people find it.
One of the most important fields is the Subtitle. It’s a quick, punchy phrase (up to 30 characters) that sits right under your app’s name. Use it to immediately communicate your app’s value. If your app is called “QuickScan,” a great subtitle would be “Fast Document & PDF Scanner.” It tells the user exactly what they’re getting.
You’ll also need to provide a URL for your privacy policy. This is a hard requirement from Apple; you can’t submit without one. If you’re not sure where to start, our guide can help: https://codepushgo.com/blog/privacy-policy-for-mobile-apps/
Next up, you’ll choose your app’s Categories. You get a primary and an optional secondary category. Picking the right ones is crucial for discoverability. If you’ve built a fitness app that also tracks meals, “Health & Fitness” is a no-brainer for your primary, and “Food & Drink” would be a smart secondary choice.
As you’re filling out these details, remember this is all part of a bigger strategy called App Store Optimization (ASO). Good ASO helps your app rank higher in search results, which means more organic downloads. To really get a handle on it, check out this Mastering ASO: Your App Store Success Guide.
Crafting Compelling Visuals and Copy
This is the part where you sell your app. Your screenshots, videos, and text are your most powerful marketing tools. Don’t rush this.
Screenshots and App Previews You can upload up to 10 screenshots for each device size. A common mistake is just showing off the UI. Instead, use them to tell a story. Add text overlays to call out key features. For instance, a screenshot of a map could have “Find Your Route in Seconds” written over it.
App Previews are short videos, between 15-30 seconds, that show your app in action. A slick preview can dramatically increase your conversion rate because it gives users a real feel for the experience before they download.
Promotional Text and Description You get two main text areas to make your case:
- Promotional Text: This is a 170-character blurb at the very top of your description. The best part? You can change it anytime without submitting a new app version. It’s perfect for announcing a sale or a new feature.
- Description: Here, you have 4,000 characters to go into detail. Explain what your app does, who it’s for, and what makes it special. Break up the text with short paragraphs and bullet points so it’s easy to scan.
Standing out is everything. With approximately 1.96 million apps on the App Store as of 2025, the competition is fierce. A polished, persuasive product page is no longer optional—it’s essential to get noticed.
Building and Uploading Your App with Xcode
With your App Store Connect product page ready and waiting, it’s time to head back into your codebase. This is the final technical hurdle: creating a production-ready build of your app and getting it over to Apple. For this entire process, Xcode is your mission control, handling everything from code signing to the final upload.
The good news? If you’ve already set up your certificates and profiles correctly, Xcode can automate a lot of the tedious work. Let’s walk through preparing your project, creating the official archive, and pushing it up to App Store Connect.
Configuring Signing and Capabilities
Before you can build anything, you need to tell Xcode exactly how to sign your app for the App Store. This is where you connect your local project to the certificates and profiles you created earlier in the Apple Developer Portal. Getting this right is a non-negotiable step in publishing your app.
First, open your project in Xcode and find the “Signing & Capabilities” tab for your main app target. This is where the magic happens.
Here are the key settings to double-check:
- Automatically manage signing: I almost always recommend keeping this box checked. It’s the easiest path forward, as Xcode will automatically find and apply the correct distribution certificate and provisioning profile from your developer account.
- Team: Make sure your developer account is selected from the dropdown menu. This tells Xcode which account’s signing assets to use.
- Bundle Identifier: This should be locked and should perfectly match the App ID you registered earlier. If there’s a mismatch here, your build will fail. Simple as that.
This is also where you’ll add the same capabilities you enabled for your App ID, like Push Notifications or Sign in with Apple. The capabilities listed here must be an exact mirror of what you configured online—a discrepancy is a classic source of build failures.
A critical but often overlooked detail is setting the build and version numbers. Your Version number (e.g.,
1.0.0) is what users will see on the App Store. The Build number (e.g.,1) is an internal counter that must be increased for every single new build you upload for that version.
Archiving Your App for Distribution
Once the signing is configured, you’re ready to create the actual package that gets sent to Apple. You don’t just hit the “Run” button like you do when testing. Instead, you’ll use Xcode’s Archive feature, which compiles your app specifically for App Store distribution.
The process is pretty straightforward. First, look at the top of the Xcode window and make sure your build destination is set to “Any iOS Device (arm64)”. This is crucial. It tells Xcode to create a generic build that can run on any compatible device, not just a simulator or a currently connected iPhone.
Next, navigate to the Xcode menu and select Product > Archive. Xcode will then kick off the build and compilation process. Depending on the size of your app, this can take a few minutes, so grab a coffee and watch for any build errors that pop up. If you hit a wall, our extensive Xcode guide might have the answer you’re looking for.
Validating and Uploading from the Organizer
When the archive finishes successfully, Xcode’s Organizer window will automatically open, showing your newly created build. Think of this as your final checkpoint. From here, you’ll validate the build and perform the final upload.
Before you upload, I always recommend validating the app first. It can save you a ton of time down the line. Select your new archive and click the “Distribute App” button.
- Choose “App Store Connect” as the distribution method.
- On the next screen, select “Validate” instead of “Upload.”
This validation process runs your build through a series of automated checks, looking for common red flags like missing icons, incorrect entitlements, or use of private APIs. It’s a fantastic pre-check that can catch issues before Apple’s reviewers do. If it passes, you’re good to go.
With a validated build, you’ll just repeat the same steps, but this time for real:
- Click “Distribute App” one more time.
- Select “App Store Connect” again.
- This time, choose “Upload”.
Xcode takes it from there. It will package your app, sign it with your distribution certificate, and upload it directly to your App Store Connect account. Once the upload is complete, your build will show up in the “TestFlight” tab in App Store Connect, usually after a few minutes of processing.
And that’s it! The technical part is officially done. Your build is now in Apple’s ecosystem, ready to be attached to your product page for final submission.
Submitting Your App for Final Review
So, your build has finished processing and is now sitting patiently in App Store Connect. You’re in the home stretch, but this final mile is where a sharp eye for detail can make all the difference. This is where you bring everything together—your product page, screenshots, metadata, and the build itself—into one complete package for Apple’s review team.
Getting an app published means joining a truly massive ecosystem. In fact, the App Store has driven nearly $1.3 trillion in billings and sales globally. That number has more than doubled in just the last five years, fueled by everything from gaming and video editing to food delivery. You can dive deeper into these numbers in Apple’s 2024 report.
Attaching Your Build and Setting the Price
First things first, let’s connect your code to your App Store listing. Head back into App Store Connect, go to the “App Store” tab for your app, and select the version you’re working on (like 1.0).
Scroll down until you find the “Build” section. You’ll see a plus icon—click that, and a list of your processed builds will pop up. Select the one you just uploaded from Xcode. It’s a simple click, but it’s the official action that links your compiled app to your product page.
Next up is money and location. Under the “Pricing and Availability” section, you’ll choose a price tier or simply set your app to be free. You can also decide which countries your app will be available in. The default is “All,” but you might want to start with a soft launch in just one or two regions to test the waters.
Answering Compliance Questions
Before you can hit that final button, Apple needs to ask a few legally required questions about your app’s content and technology.
You’ll be prompted to answer a few things:
- Export Compliance: Does your app use encryption? If you’re making standard HTTPS/TLS web requests, the answer is yes. Don’t worry, though; most apps fall under an exemption that doesn’t require any extra paperwork.
- Content Rights: Do you own the rights to all the third-party content in your app? Be honest here to avoid legal headaches down the road.
- Advertising Identifier (IDFA): Does your app use the IDFA? If you’ve included any third-party ad SDKs, you must declare it and explain exactly what it’s used for.
One of the most overlooked—and most critical—parts of this process is the “Notes for Reviewer” section. This is your one chance to speak directly to the human who will be testing your app. If your app requires a login, provide a demo account username and password. If a key feature is a bit hidden, give them step-by-step instructions. A few clear, helpful sentences here can be the difference between a rejection and an approval.
Hitting Submit and Understanding What’s Next
With all the fields filled out, a bright blue “Submit for Review” button will appear at the top right of the page. Clicking it officially sends your app into Apple’s review queue.
Once you submit, your app’s status will change. It can be a little nerve-wracking watching it move through the different stages. For a full breakdown of the rules your app will be checked against, take a look at our guide to the App Store Review Guidelines.
Now, the waiting game begins. While review times can vary, Apple has gotten much faster, and many reviews are now completed within 24-48 hours. You’ll get an email and see a status update in App Store Connect as soon as the review is done.
Common App Store Review Statuses Explained
After you submit, your app’s status in App Store Connect will change as it moves through the pipeline. Here’s a quick cheat sheet to help you understand what each status means.
| Status | What It Means | Next Steps |
|---|---|---|
| Preparing for Submission | You’re still editing the app’s details and haven’t submitted it yet. | Finish filling out all required metadata and attach your build. |
| Waiting for Review | You’ve successfully submitted your app, and it’s in the queue waiting for a reviewer to pick it up. | Nothing to do but wait! You can’t make any edits at this stage. |
| In Review | An Apple reviewer is actively testing and evaluating your app against the guidelines. | This is the active review phase. Keep an eye on your email for updates. |
| Pending Developer Release | Your app was approved! It’s now waiting for you to manually release it on the App Store. | Go to your app’s page in App Store Connect and click the “Release” button. |
| Ready for Sale | Congratulations! Your app has been approved and is now live on the App Store for users to download. | Time to celebrate and monitor your app’s performance. |
| Rejected | Your app was not approved. Apple will provide feedback in the Resolution Center explaining why. | Carefully read the rejection notes, fix the issues, and resubmit a new build. |
| Metadata Rejected | Your build was approved, but there’s an issue with your app’s description, screenshots, or other metadata. | Fix the metadata issues noted by Apple and resubmit without needing a new build. |
Understanding these statuses helps demystify the process and keeps you informed every step of the way. Good luck
Answering Your Top App Store Questions
Even after you’ve dotted every ‘i’ and crossed every ‘t’, you probably still have a few nagging questions. I get it. This final stretch can feel like a total black box, but knowing what to expect can make all the difference.
Let’s walk through some of the most common questions I hear from developers shipping their first app.
How Long Does the App Store Review Process Take?
This is the million-dollar question, isn’t it? The honest answer is: it really depends. Apple has gotten incredibly fast over the years, and it’s not uncommon to see approvals within 24 to 48 hours.
But you can’t bank on that. My advice? Always build a buffer of at least a week into your launch plan.
A few things can slow you down. A complex app with in-app purchases or user-generated content will naturally take longer. And if you’re a first-time publisher, expect a bit more scrutiny. The review queue also gets slammed around major holidays and right after Apple drops a new iOS version. Trust me, trying to rush a submission to hit a tight deadline is a recipe for a very bad week.
What Are the Most Common Reasons for App Rejection?
The number one reason for rejection is shockingly basic: bugs and crashes. Apple’s Guideline 2.1 on Performance is no joke. If you submit a build that’s unstable or incomplete, you’re getting rejected. Period. That’s why exhaustive testing isn’t just a good idea—it’s essential.
A few other common roadblocks I see all the time are:
- A shoddy Privacy Policy: A missing, incomplete, or buried privacy policy is an instant rejection under Guideline 5.1. Make it clear and easy to find.
- Misleading Information: Your screenshots, description, and metadata need to be an honest reflection of what your app actually does. No exceptions.
- Broken Links: Every single link in your app has to work. Pay special attention to your support URL and privacy policy link.
Don’t treat the review guidelines as friendly suggestions. They’re a strict checklist. Going through them one by one before you submit is the single best thing you can do for a smooth approval.
Can I Update My App After It Is Published?
Of course! Shipping your app is just the starting line. You absolutely can—and should—push regular updates. This is how you’ll fix bugs, roll out new features, and show your users you’re listening to their feedback.
The process is almost identical to your first submission. You’ll create a new version in App Store Connect, upload a new build, write your “What’s New in This Version” notes, and send it off for review. Each update goes through the same approval process, though in my experience, updates for an existing app sometimes get through a little faster.
Keeping your app fresh is key to keeping users engaged. For React Native developers, a tool like CodePushGo can be a game-changer here. It lets you push JavaScript and image updates directly to your users’ devices, completely bypassing the App Store review for many small fixes. That means you can squash a bug in minutes, not wait days for an approval.


